Monday, May 30, 2011

Bannack Ghost Town


May 25, 2011 -Time: 5:40pm- Camera: Nikon D3000
F 9/0 Shutter speed: 1/320


May 25, 2011 -Time: 5:34pm- Camera: Nikon D3000
F/ 9.0Shutter speed: 1/200


May 25, 2011 -Time: 5:30pm- Camera: Nikon D3000
F/10.0 Shutter speed: 1/250
May 25, 2011 -Time: 12:10am- Camera: Nikon D3000
F/2.8 Shutter speed: 1/1000


May 25, 2011 -Time: 5:45pm- Camera: Nikon D3000
F /3.5 Shutter speed: 1/80


May 25, 2011 -Time: 4:20pm- Camera: Nikon D3000
F /3.8 Shutter speed: 1/50


May 25, 2011 -Time: 4:10pm- Camera: Nikon D3000
F/5.6 Shutter speed: 1/30


May 25, 2011 -Time: 12:00am- Camera: Nikon D3000
F 9/0 Shutter speed: 1/320


May 25, 2011 -Time: 12:00am- Camera: Nikon D3000
F 9/0 Shutter speed: 1/320


May 25, 2011 -Time: 5:50pm- Camera: Nikon D3000
F/16.0 Shutter speed: 4.0

Bannack Best
May 25, 2011 -Time: 5:52pm- Camera: Nikon D3000
F 16.0 Shutter speed: 4.0

May 25, 2011 -Time: 5:40pm- Camera: Nikon D3000
F/ 3.5 Shutter speed: 1/15

May 25, 2011 -Time: 5:40pm- Camera: Nikon D3000
F/ 5.6 Shutter speed: 1/1250

May 25, 2011 -Time: 3:30pm- Camera: Canon PowerShot SX110 IS
F/4.3 Shutter speed: 1/250


May 25, 2011 -Time: 5:59pm- Camera: Nikon D3000
F/5.6 Shutter speed: 1/60


This weeks blogpost is one of the most intresting post that i will do during this semester of digtal imageing. This week we got to traval to Bannack Ghost town. Its a small gold mining town in montain, that was shut down in the mid 1970s. to say the least its an amazing location to take pictures.We were asked to take a few different shots this week

-3 landscapes: The first shot i took was one of the river that runs along the town. The orginal shot was pretty good, but the top of the sky was washed out. I copied the layer then turn up the saturation and changed the hue a little. then i took the eye dropper and took a color from the river and started to paint the sky. I work with different colors and oppacities to get the affect i wanted, then went in with a yellow color and made the high lights more golden.
the second shot was of an old barrel near the river, the  3rd is a panoramic of the river side. just a few simple edits, truned up the saturations, and the change the hue.

-1 macro abstrat: We were asked to take a marco shot and a texture shot and blend them together to make a united peice of art. I took a cool shot of this of a table leg where the paint was peeling off. Then i took a picture of a tree stomp , focusing on the rings. i took the shot of the tree and blended it on the wood of that was showing on the table leg. its just simple detail,  but i think it just addeds a little more texture to the table.

-2 Portraits: These two portraits are some of my favorites, out of the hundreds i took at Bannack. The first portrait, i chose for the interesting angle which it was taken from. In Photoshop, i copied the image, then made a selection of just her eyes and copied them to their own layers. I then added a High Pass filter on the eyes, and change the layer to soft light. This brought out the natural colors and reflections in her eyes. I then changed the copied layer of the whole picture to overlay and masked out the affect around her face.

For the second photo i copied the image, then used the same eye trick, as on the first portrait. I did some air brushing to smooth the skin and remove some blemishes. Then i added a adjustment layer to increase the saturation and hue of the photo.

2 Revers Depth Of field- On these shots i saw this rope handle on a barrel and thought it looked cool, so i took one shot making sure the rope was in focus, then the same shot, making sure the back ground was in focus.

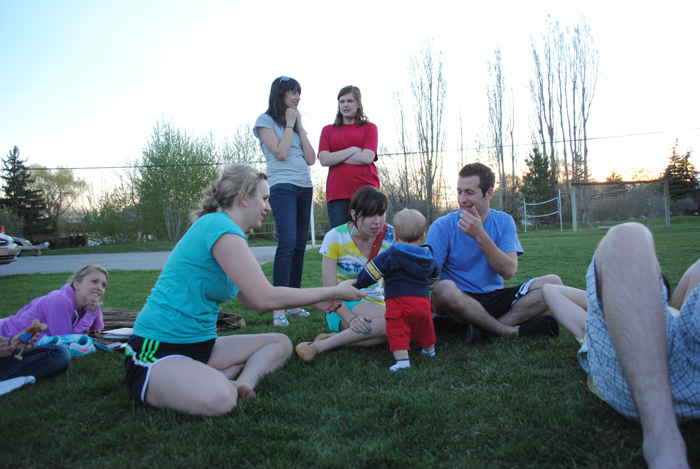
2 Blur motion, freeze motion: The first one i took a shot of my friend and one of the children that came with us on the trip, while they were spinning on the merry go round. i made sure to have lots of light, so that my fast shutter speed could freeze the action. The second picture was taken in the dark hall way of the hotel. We had a low shutter speed of 4 seconds, so that we could create a ghostly look. My friend would stay for 2 seconds in the shot, then she would move out of the shot for the last two seconds.

Bannack Best:

1-The first shot like the other was made possible with a slow shutter speed. I then took it into camera raw and change the exposure and temperature to get the look i wanted. Im not sure if i like it 100% yet, so i think i will change it when i get more time.

2-This second portrait is my favorite of the whole shoot so far. The shot it self was nothing to special, when i was light metering, i over exposed it a little, but not past the point of saving. I really liked the shot, because of the fun pose brittany was doing, it was very "high fashion".. lol. I took the photo into camera raw and change the exposure, raised the blacks and shadows and improved the clarity. Once i got the photo to where i wanted it, i took it into photoshop. I started by copying the image, next i spent like 30 mins air brushing her arm and face. Her skin was fine, but the lighting on her face and arm was very harsh in spots, so i used the air brushing to fix those lighting mistakes. I then made a selection of her eyes and copied them to a new layer. I then look through some of my other pictures that i took of her, and found a photo where the color in her eyes was really rich. I then took that photo and selected her eye and hid the rest of the photo. Once i had both eyes selected i went to adjustments and match color and selected the photo with the rich eye color and color matched it. It turned out very nature, i turned down the opacity and blended my ruff selection edges around the eye, to make sure it look great. then i copied the layer again and selected soft light, then i did the same thing again. Finally i took the burn tool at 52% exposure, and burned around the edges of the photo to give it a vignette. 

3- This photo of jessica was take while we were walking back to the bus to go home. I had my camera out and was just snapping random pictures. I got this great candid shot of her while she was talking and laughing with her friend behind her. I love the shot because it shows her personality.

4- This shot of sister Esplin, was taken with my little point and shot. We were all standing and listening to the tour guide talk to us about Bannack. I was taking pictures of random people in our group and got this great shot of our teacher. She was smiling at something that the guide had said. later on she noticed i was taking pictures of her, and we had a good laugh about it.

5-The last one i chose as my best is one of brittany again, She just happened to be very photogenic. I like it because of the great color and intensity in her eyes and the nice side light on her face.

I did have time to edit all my favorites, so when i do get them done i will post them.


Monday, May 23, 2011

Portraits and Enhancements

Group Activity: Date: May 20, 2011 Time: 7:30pm 
Camera: Nikon D3000 F/ 5.6 , 1/60

Group Enviromental: Date: May 20, 2011 Time: 7:25pm 
Camera: Nikon D3000 F/ 3.5 , 1/250


Group Posed: Date: May 20, 2011 Time: 7:20pm 
Camera: Nikon D3000 F/ 5.6 , 1/200


Individual Full body: Date: May 18, 2011 Time: 3:00pm 
Camera: Nikon D3000 F/ 5.6 , 1/125


Individual Head & Shoulders: Date: May 18, 2011 Time: 2:50pm 
Camera: Nikon D3000 F/ 5.3 , 1/30


Side composition: Date: May 20, 2011 Time: 7:15pm 
Camera: Nikon D3000 F/ 5.6 , 1/100
ENHANCEMENTS
Edit air brush, eyes, teeth: Date: May 18, 2011 Time: 3:15pm 
Camera: Nikon D3000 F/ 5.6 , 1/125


ORIGNAL

MATCH COLOR
Color sample
 Orignal
Color replacement


Portraits: This weeks assignment has been really fun, one of my favorites so far. When i got the assignment i had no idea what i was going to do. i kind of forgot about the assignment for a few days and just happened to bring out my camera one day when we were playing volleyball with some of my friends and their families. The light was great that day, i took a lot of the shots close to sun set, so i got great filtered light on my group posed, group activity, side composition and group environmental.
On my other individual shots i got my wonderful friend anne, to come and pose for me as i took pictures. I chose to go to down town Rexburg because of the brick alley ways and other great back ground textures. I found a partly shaded alleyway, that gave great side light and made for some really interesting lighting opportunities.

On my edit photos i just did some simple edits to make the pictures better. On the first photo i air brushed her face a little, mostly on her chin, to get ride of some of the redness that was there. Then i used the spot healing tool to get ride of some of the blemishes on her face. i then , using the magnetic lasso tool, selected her eyes, copied the layer, put a high pass filter and then added soft light to make her eyes stand out more. i then copied that layer twice to enhance the affect.
For the color replacement i just went into adjustment then to color replacement and selected the back ground wall, and changed the hue to more of a orange color then increased the saturation. Then i decreased the opacity of the layer to make it more natural looking.

Monday, May 16, 2011

Panoramic Blend & Camera Raw

Date: May 13, 2011 Location: Spori Quad , F/ 9.0-8.0 ,1/320-1/250

This Panoramic was taken on top of this kind of island in front of the Spori Art building. I set up my tri pod and centered my shot then started at the left and twisted my camera and overlap my images as i went. I then used photo-merge to create the panoramic.I think it turned out pretty cool, it made a rounded wall appear liner in shape, which was something that i didn't expect. Thankfully for me the people in the photos just sat still as i took the picture! i then added a levels and saturation adjustment mask to give the image more color and depth.

Monday, May 9, 2011

Smart Editing

Canon Power Shot SX110SI, Location: BYU 
Date: May 7, 2011 Time: 3:15, F/2.8 1/800


Nikon D3000, Location: BYU 
Date: May 7, 2011 Time: 3:05, F/7.1 1/200


Nikon D3000, Location: Logan Ut
Date: May 7, 2011 Time: 10:13, F/8 1/400Smart Editing


1-Image one i started by using the saturation adjustment layer. i boosted the hue to +12 and the saturation to +24 and brought down the lightness in the photo. I wanted to make sure the flowers looked as rich as they could be. I then used a levels adjustment layer and evened out all my levels. Then i copied the background layer and converted it into a smart object and added a gaussian blur to create more blur in the photos background. Then using the mask that comes with the layer i took the affect away from the bee and the surrounding flowers. I then used  smart sharpen to make the bee more in focus. 
2- On these tulips i created a black and white adjustment layer. I increased the yellows and reds in the photo and brought down the greens to give it a greater range of black and white values. Then using the mask i painted black paint on to the image, and brought back all the color just to one flower, to give the image a main focal point.

3-For this wild flower photo i got a great shot with lots of blur like i wanted. I loved the color and balance in the photo so i chose not to use and saturation or levels to change the look of the shot. So i chose to use a black and white adjustment layer. I didnt mess with any of the colors i left them as they were. I just used the mask to bring the color back to the flower and the stick it was resting on.


Flora and Animales

Canon Power Shot SX110SI, Location: BYU 
Date: May 7, 2011 Time: 3:15, F/2.8 1/640

Canon Power Shot SX110SI, Location: Salt Lake 
 Date: May 8, 2011Time: 3:15, F/2.8 1/64

Canon Power Shot SX110SI, Location: BYU 
Date: May 7, 2011 Time: 3:15, F/3.2 1/250

Flora and Animales
1-This picture was taken while i was visiting my mom for mothers day down in provo. i chose my power shot because of its powerful zoom and marco focusing features, these qualities allowed me to get a great shot.

2-This picture was taken at my grand mothers house in Salt Lake. it was raining out side and these ducks were huddled down in the front yard. I zoomed in on the duck so i didn't scare them away and used a bush to create a larger depth of field.

3-This is just a simple marco shot. I got the camera right above the flower and got as close as i could with out being out or focus and took the shot. i have a series of these tulips in all different colors, i might just post the series in the next few weeks.

Monday, May 2, 2011

Photo Blending

1
Date: April 30, 2011 Location: R Mountain Time: 4:45 pm F/4.0 1/640

2
Date: April 30, 2011 Location: R Mountain Time: 4:42 pm F/3.5 1/60

3
4
Date: April 30, 2011 Location: R Mountain Time: 4:38 pm F/3.5 1/200

5
Date: April 30, 2011 Location: R Mountain Time: 4:59 pm F/3.2 1/1250

6

Date: April 30, 2011 Location: R Mountain Time: 4:45 pm F/4.0 1/1000
7

Blending Photos:
1-On this photo i had my friend stand on a rock above me, he was about 10 above me. I then got close to the rock face and zoomed up to focus on my friend. When i zoomed in, it created a very cool blur on the rock face that was closet to the camera.
2-This photo i was look specifically for textures for this project. This rock with all its different colored moss, was in a dark shadow, so i turned down my shutter speed to 1/60 to bring in more light.
3- This is the final product of photos one and two blended together. I started with the picture of my friend then placed the rock photo on top. I then selected the green color channel and turned down the opacity of the photo down to 57%. i added a blending mask and using black and white paint i blending the rock more into the sky and made the subject free from the texture.
4-Another texture shot, i used macro focus and got really close to the log to get this clear shot.
5-On this photo i found a stick and started playing with extreme back ground blur. i used my friends to create a interesting background color for my close up of the stick. I i used zoom and macro focus to get the blurred background and clear foreground.
6-This photo was taken on a 10 second self timer. I wanted to get a shot of my self on this cliff, i knew that they sun was really bright so i turned up my shutter speed to 1000, to let in less light. 
7- So on this Blending images and using type photo, i wanted to create a scene from our saturday adventure. i started with the image of the stick and placed the photo of me on the cliff and reduced the opacity. I placed a mask over those photos and blended  the mountain photo into the background. I really wanted to make sure the stick stayed exactly was it was taken, so that i could create some depth in the photo. I then placed the wood photo on next, at a low opacity as well. I added a blending mask and went to work with my black and white paint. I tried a few different ways of showing the texture in the picture, but i finally decided to us the texture just on the rocks that i was kneeling on. I then used the eye dropper to pick a color from one of the images and used that for the text color. I simply choose the word "adventure" because it describe the scene the best.


Color Study

1
Date: May 2, 2011 Location: Rexburg ID, 9:02 am, F/2.8, 1/160

2
Date: May 2, 2011 Location: Rexburg ID, 9:01 am, F/2.8, 1/250

3
Date: May 2, 2011 Location: Rexburg ID, 8:50 am, F/3.5, 1/320

4
Date: May 2, 2011 Location: Rexburg ID, 9:00 am, F/4.0, 1/500

5
Date: May 2, 2011 Location: Rexburg ID, 8:41 am, F/3.5, 1/1000

6
Date: May 2, 2011 Location: Rexburg ID, 8:42 am, F/2.8, 1/1250

7
Date: May 2, 2011 Location: Rexburg ID, 8:40 am, F/4.0, 1/1250
Color Study: This morning i was walking to campus, thinking of what color i should chose for my color study. Then i saw this truck, and i knew that yellow was the color i wanted to do. All these photos have no edits, i want to go back and enhance the photos when i have time. The sun was really bright, so i tried raising the shutter speed to prevent my photo from being blow out. Using zoom and macro focus, i created back ground blur in photo 5. In photo 1, it was in a shadow of a building so i slowed my shutter speed to bring in more light, but in the end i used my auto settings and got a great shot. In photo 3 i let in a little more light, it made it seem like the white flowers were glowing. Over all i enjoyed this assignment, its been fun trying new tricks and technics.